Achieving professional coastal long exposures goes far beyond simply using an ND filter; it requires mastering environmental physics and mechanical stability.
- Light control involves managing invisible infrared (IR) pollution, not just visible brightness, which is the primary cause of stubborn colour casts.
- Tripod stability in high winds depends on eliminating pendulum effects and anchoring low to the ground, not just adding indiscriminate weight.
Recommendation: Treat your equipment as a long-term asset. Proactively protecting it from the corrosive coastal environment is essential for consistently creating high-value fine art.
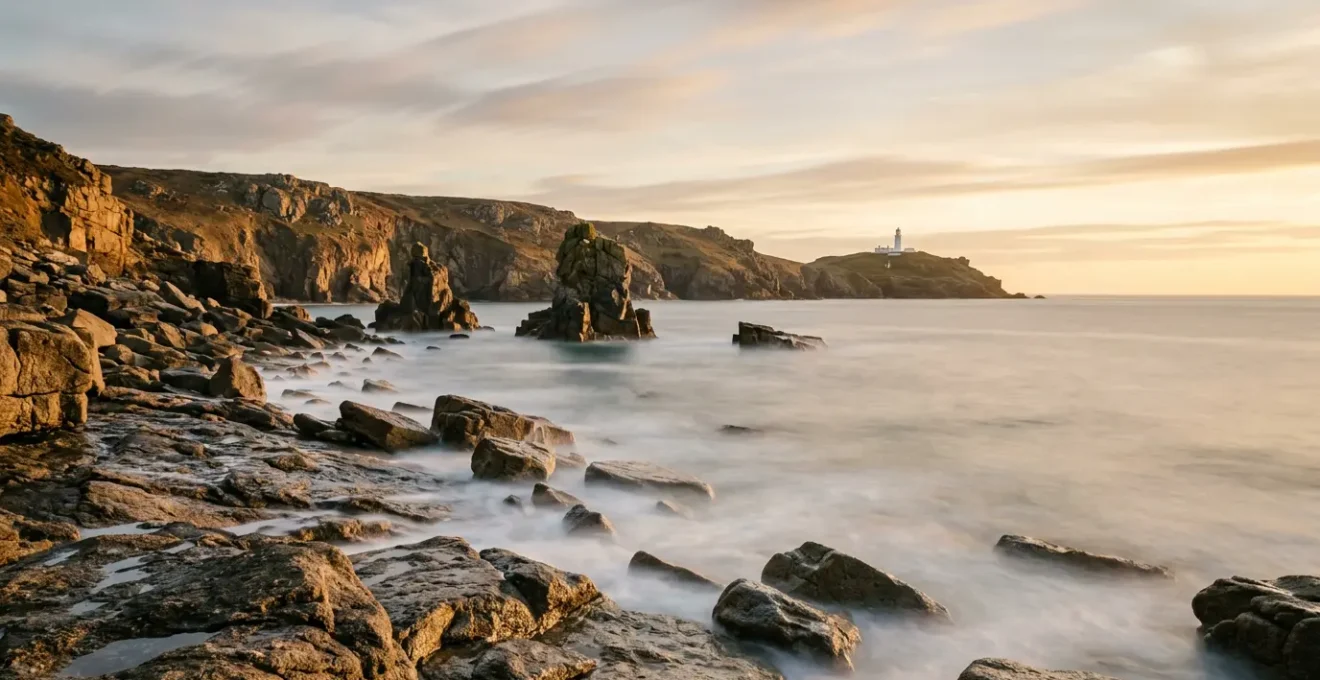
Standing on the cliffs of the Cornish coast, the wind whipping past and the midday sun blazing down, you see the potential for a masterpiece. You imagine the churning sea transformed into a soft, ethereal mist, the clouds streaking dramatically across the sky. You know the “milky water” effect is possible, but every attempt results in a blown-out, white rectangle. It’s a common frustration for passionate landscape photographers who have moved beyond the basics and are now confronting the harsh realities of a challenging environment.
The common advice echoes in your mind: “get a 10-stop ND filter,” “use a sturdy tripod,” “shoot at a low ISO.” And while this is all true, it’s merely the entry ticket. It’s the knowledge that gets you to the coast, but not what allows you to leave with a truly breathtaking image. These tips are the ‘what’, but they completely miss the ‘how’ and, more importantly, the ‘why’. They don’t prepare you for the physics of light contamination or the brutal mechanics of a 40mph gust on a sandy beach.
But what if the key wasn’t just in the gear you use, but in a deeper understanding of the forces at play? What if creating a stunning long exposure was less about blocking light and more about mastering environmental hostility? This guide is built on that premise. It’s for the photographer who is ready to move beyond formulaic advice and learn the art and science of taming a wild coastline. We will explore the very nature of light, the secrets to unshakeable stability, the art of composition with moving elements, and the crucial science of protecting your gear as a valuable asset.
This article provides a complete framework for mastering coastal long exposures, moving from foundational physics to advanced artistic principles. The following sections break down each critical component of the workflow, offering the insights of a seasoned workshop leader to elevate your craft.
Summary: Mastering Coastal Long Exposure: How to Tame the Light and Tides of Cornwall
- Why can’t you achieve a 30-second exposure at midday without glass?
- How to weigh down your tripod on a sandy beach in 40mph gusts?
- Water vs Clouds: which element anchors a long exposure composition better?
- The lens cleaning error that grinds salt crystals into your glass coating
- How to correct colour casts caused by strong 10-stop ND filters?
- Why does bronze turn green faster in coastal UK locations?
- Why does a weak Pound make London auctions attractive to US buyers?
- Capturing Time in Urban Photography: Documenting the Changing Face of Manchester?
Why can’t you achieve a 30-second exposure at midday without glass?
The simple answer is that there is an overwhelming amount of light. Even at your camera’s base ISO (100) and smallest aperture (f/22), the sheer volume of photons hitting your sensor during a 30-second window at midday is too immense to handle. It’s like trying to fill a thimble with a fire hose; the result is a completely overexposed, white image. A neutral density (ND) filter acts like sunglasses for your lens, reducing the amount of light and allowing you to use a much longer shutter speed. However, not all “glass” is created equal.
The hidden challenge is not just visible light, but invisible infrared (IR) light. Cheaper ND filters often struggle to block this part of the spectrum, leading to what is known as IR pollution. This manifests as a strong, difficult-to-correct magenta or reddish colour cast. The problem is that while blocking visible light, many standard filters allow significant IR contamination; comprehensive testing shows that cheaper ND filters can cause up to a 2/3 stop overexposure due to this invisible light alone. This is why investing in high-quality IRND filters is crucial for clean, colour-accurate images.
An alternative, “glassless” technique is image stacking. Instead of one long exposure, you take hundreds of short exposures (e.g., 1/60s) without moving the camera. Software then averages these images together, simulating the motion blur of a long exposure. This method completely bypasses the problems of IR pollution and can produce exceptionally clean results, though it requires more effort in post-processing and is best suited for scenes where this digital approach is feasible.
Understanding this balance between light quantity and quality is the first step toward intentional, professional results, moving you from simply taking a picture to crafting an image.
How to weigh down your tripod on a sandy beach in 40mph gusts?
In the face of a coastal gale, a sturdy tripod is your best friend, but the common advice to “weigh it down” is dangerously incomplete. The instinctive reaction is to hang your camera bag from the centre column hook. This is a critical mistake. Hanging a heavy weight creates a pendulum, which can catch the wind and swing, introducing more vibration and instability than it solves. True stability comes from anchoring the system, not making it top-heavy.
The professional approach, as confirmed by field tests, is to use low-profile saddle sandbags. Instead of hanging from the centre, these bags are draped directly over the legs of the tripod, close to the ground. This lowers the centre of gravity and provides 360-degree stability without the risk of creating a pendulum. If you don’t have dedicated sandbags, a DIY solution using refillable bags filled with local sand or smooth stones can offer comparable performance for zero cost, providing the same essential function of anchoring the legs firmly.
As the image above illustrates, the goal is to make the tripod an immovable object, one with the landscape itself. This requires a systematic approach, especially in the challenging conditions of a sandy beach lashed by wind. Following a strict protocol ensures that no vibration, whether from the wind or your own touch, ruins your long exposure.
Your Wind-Resistant Tripod Setup Protocol
- Lower your tripod to its minimum working height. This reduces its profile and gives the wind less leverage.
- If your tripod has spikes, extend them and push the legs deep into the wet, compacted sand beneath the loose surface layer for a solid footing.
- Place 10-15 lb sandbags directly on each tripod leg joint or foot, ensuring the weight is low and stable, not hanging.
- Use your own body as a shield. Position yourself upwind of the camera to act as a windbreak, but be careful not to touch the tripod during the exposure.
- For extreme conditions, use shock cords or guy lines to create a triangular ground anchor system, attaching them to heavy rocks or specialized ground stakes.
By shifting your mindset from “weighing down” to “anchoring,” you transform your tripod from a precarious stand into a rock-solid platform, capable of withstanding the worst the coast can throw at it.
Water vs Clouds: which element anchors a long exposure composition better?
This question is a wonderful artistic dilemma, and the answer is: it depends entirely on the story you want to tell. In long exposure photography, we abstract reality. We are not just documenting a scene; we are interpreting it through time. Both water and clouds are your primary “fluid” elements, and your choice of shutter speed dictates their character. The true anchor of the composition is almost always a static element—a sea stack, a lighthouse, a pier—and the water and clouds provide the dynamic narrative around it.
The key is to decide which element will carry the most emotional weight. Do you want to convey the raw power of the ocean? A shorter exposure of 0.5 to 2 seconds will retain the texture and motion trails of the waves, creating a dynamic, streaky effect. Or is your goal a serene, minimalist mood? A longer exposure of 5 to 30 seconds will smooth the water into a silky, ethereal surface, creating a sense of calm. Go even longer, beyond a minute, and the water can transform into a thick, abstract fog.
The movement of clouds offers a different kind of dynamism. On a windy day, a long exposure of 2 to 5 minutes can turn scattered clouds into dramatic streaks that lead the viewer’s eye across the frame, adding a powerful sense of direction and scale to the sky. The choice between emphasizing water or clouds depends on which one has the more interesting movement and how it interacts with your static anchor.
| Element | Optimal Shutter Speed | Visual Effect | Best Use Case |
|---|---|---|---|
| Streaky Water | 0.5-2 seconds | Dynamic motion trails | Convey energy and power |
| Silky Water | 5-30 seconds | Smooth, ethereal surface | Create calm, minimalist mood |
| Misty Water | 60+ seconds | Fog-like abstraction | Emphasize static elements |
| Streaking Clouds | 2-5 minutes | Directional movement | Add dynamism to sky |
Ultimately, long exposure photography is a tool for seeing the world differently. It allows us to capture a dimension—time—that is normally invisible. As the celebrated photographer Francesco Gola beautifully articulated in 500px ISO Magazine:
The real voyage of discovery consists not in seeking new landscapes, but in having new eyes. Long exposures have exactly that; an incredible power to let you see a place that you think you know well with new eyes.
– Francesco Gola, 500px ISO Magazine
So, don’t ask what anchors the composition better. Instead, ask: what story does this landscape want to tell, and how can I use time to reveal it?
The lens cleaning error that grinds salt crystals into your glass coating
The most insidious threat on the coast isn’t a rogue wave, but the invisible, corrosive salt spray that coats everything. When this fine mist dries on your lens, it leaves behind microscopic salt crystals. To the naked eye, it’s just a slight haze. To your lens coating, it’s sandpaper. The single most destructive error a photographer can make is to take a microfiber cloth and wipe this “haze” away. This action grinds the abrasive salt crystals directly into the delicate multi-layer coatings on your front element, causing permanent micro-scratches and destroying its optical performance.
Protecting your lens is a non-negotiable discipline. The first line of defense is a high-quality UV or clear protection filter. Think of this as a sacrificial element; it’s far cheaper to replace a scratched filter than to repair a damaged lens. However, even the filter must be cleaned with extreme care. The golden rule is to never apply friction to a dry, salt-sprayed surface.
The correct procedure involves a multi-step, contact-free approach first. Start with a high-power air blower (like a Giottos Rocket Blower) to remove any loose particles of salt and sand. Only after you have blown the surface clean should you introduce any liquid. Apply a few drops of a quality lens cleaning solution to a fresh, single-use lens wipe or a clean section of a microfiber cloth—never directly onto the lens itself. The solution dissolves any remaining salt residue, neutralizing its abrasive properties. Now, and only now, can you gently wipe the lens in a circular motion, from the centre outwards, to remove the dissolved solution and grime.
As professional seascape photographer Alexa Rakow emphasizes in her work with Olympus, even with top-tier weatherproof gear, this kind of proactive protection is essential. Her workflow includes keeping lens caps on until the moment of shooting and constantly monitoring for “sneaker waves,” reinforcing the idea that no amount of weather sealing can replace situational awareness and a meticulous cleaning protocol.
By treating salt spray with the respect it deserves, you ensure your lenses continue to deliver the sharp, clear images you expect, shoot after shoot.
How to correct colour casts caused by strong 10-stop ND filters?
One of the most persistent frustrations with daytime long exposures is the stubborn colour cast that can appear, often a noticeable magenta or blue-green tint. Many photographers spend hours in post-processing trying to neutralize it, but the fix is often imperfect because they are treating a symptom, not the cause. The problem isn’t just a simple colour shift; it’s a form of light contamination caused by infrared (IR) pollution. While your 10-stop ND filter is busy blocking visible light, it may be letting a significant amount of invisible IR light pass through to the sensor.
Your camera’s sensor is sensitive to this IR light, but it interprets it as part of the red channel, creating a strong, unnatural magenta cast that contaminates the entire image. This is why cheap filters are a false economy; their poor IR control is the source of endless post-processing headaches. Scientific testing confirms this is a physical problem, as traditional ND filters can transmit 70-90% of infrared light while effectively blocking the visible spectrum. The solution lies in either using high-quality filters with built-in IR-cut coatings or correcting the issue at the source: in-camera.
As the comparison above visually demonstrates, the difference between a clean, neutral image and one tainted by IR pollution is stark. The most effective way to combat this is to create a custom white balance profile in your camera *with the ND filter already attached*. The process is simple: place a neutral grey card in the same light as your scene, put your ND filter on the lens, and take a photo of the grey card, filling the frame. Then, navigate your camera’s menu to set that image as the reference for your custom white balance. From that point on, every subsequent photo taken with that filter will be automatically neutralized in-camera, delivering clean, colour-accurate files and saving you from a post-processing nightmare.
This simple, proactive step transforms your workflow, shifting your focus from fixing problems to creating art.
Why does bronze turn green faster in coastal UK locations?
This question, seemingly about public statues, holds the most important lesson for a coastal photographer. The iconic green patina (verdigris) that forms on bronze in coastal areas like the UK is the result of an accelerated chemical reaction. It’s caused by high humidity and, most critically, the presence of airborne chlorides from sea salt. This same aggressive chloride ion attack that is slowly dissolving a bronze statue is, at the same time, waging a silent war on your photography equipment.
Every metal component on your camera and tripod—screws, hot shoe contacts, tripod leg locks, zipper pulls—is a potential victim. The salt-laden air penetrates even the tiniest crevices, initiating corrosion that can seize moving parts and degrade electronic contacts. As documented in coastal photography guides, the effects are devastating over time. Photographers report tripod leg seizure, where salt and sand weld the sections together, and the complete failure of electronic components due to corrosion on circuit boards.
The rubber grips on your camera body and lenses can also degrade, becoming sticky and losing their form as the salt attacks the polymers. It’s a slow, insidious process that doesn’t become apparent until the damage is done. The connection is direct and unavoidable, as the Coastal Photography Safety Guide from Iceland Aurora bluntly states: “The same chemical process destroying statues is rusting your tripod screws and eating your camera’s electronics.”
This isn’t just about cleaning; it’s about understanding that you are operating in a chemically hostile environment. After every single coastal shoot, without exception, your gear requires a thorough cleaning—not just of the lens, but a wipe-down of the entire camera body, tripod, and even your camera bag with a damp, fresh-water cloth to remove the corrosive salt residue.
By seeing the coast through the eyes of a chemist, you can take the necessary steps to protect your investment and ensure your gear is ready for the next adventure.
Why does a weak Pound make London auctions attractive to US buyers?
At first glance, the world of fine art auctions seems far removed from a windswept Cornish beach. But the underlying principle—asset value and investment—is exactly the same. When the Pound is weak, a US buyer can acquire a valuable asset, like a painting from a London auction house, for fewer dollars. They are making a smart investment. As a landscape photographer aspiring to create fine art, you must adopt the same mindset towards your equipment. Your gear is not a collection of disposable tools; it is an investment in your ability to produce valuable assets—your images.
Nowhere is this more apparent than with ND filters. A cheap, $30 10-stop filter seems like a bargain compared to a $250 professional IRND filter. But this is a false economy. The cheap filter introduces severe colour cast and IR pollution, forcing you to spend significant time in post-processing trying to salvage the image. If your time is valuable, this “bargain” quickly becomes expensive. Considering a high-quality filter can eliminate 10-15 minutes of colour grading per image, the investment pays for itself in saved time and superior final assets.
A smart gear investment strategy prioritizes long-term value over short-term savings. This means choosing filters made from hardened glass (like Corning Gorilla Glass) for impact resistance, and those with brass frames over aluminum to prevent thread binding and seizing in changing temperatures. It means viewing a $500 tripod not as an expense, but as a platform that enables the creation of thousands of dollars worth of saleable fine art prints by providing unshakeable stability in all conditions.
Just as the US buyer leverages a weak Pound to acquire a masterpiece, you should leverage smart investment in your gear to create your own. You are not just buying a camera; you are capitalizing your fine art business.
When you see your equipment as appreciating assets that enable your art, every purchase decision becomes clearer and more strategic.
Key Takeaways
- IR pollution, not just brightness, is the true enemy of daytime long exposures; manage it with quality filters or in-camera white balance.
- True tripod stability comes from anchoring low with sandbags on the legs, not by hanging weight from the centre column, which creates a pendulum.
- The goal of long exposure is artistic abstraction. Match your shutter speed to your creative intent—whether it’s powerful, streaky water or serene, misty seas—rather than following a rigid formula.
Capturing Time in Urban Photography: Documenting the Changing Face of Manchester?
After mastering the forces of nature on the Cornish coast, it’s easy to think of these skills as niche, applicable only to seascapes. But the fundamental principle you have learned is universal and profoundly powerful. The core of long exposure photography is not about ‘milky water’; it’s about beautifully rendering the relationship between a static element and a fluid element. This principle is just as potent in the heart of a bustling city like Manchester as it is on a deserted beach.
In Manchester, the towering Victorian and modern buildings are your static anchors, the urban equivalent of Cornwall’s granite cliffs. The fluid motion is not the tide, but the ceaseless flow of human activity: the red and white light trails of traffic on Deansgate, the blur of commuters rushing through Piccadilly Station, the passage of a tram across a rain-slicked street. The timescale changes—from the minutes-long breathing of the ocean to the seconds-long pulse of city traffic—but the artistic technique is identical.
As the photography guide Capture Landscapes notes, “The core long-exposure principle is identical. In Manchester, the buildings are the static element and traffic is the fluid motion. On the coast, the cliffs are the static element and the water/clouds are the fluid motion.” You are still capturing time, but instead of documenting natural cycles, you are documenting the rhythm of human life. A 30-second exposure of a busy intersection doesn’t just create pretty light trails; it visualizes the energy and transience of urban existence against the permanence of the built environment.
The skills you honed in Cornwall—meticulous composition, unwavering stability, precise light control—are your passport to mastering any environment. You have learned to see the world not as a static snapshot, but as a stage of constants and variables. This is the vision of an artist.
Now, take these principles and apply them to your own world. Look for the static and the fluid in the landscapes around you, whether they are natural or man-made, and begin to tell their stories in time.