Recording classical music in sonically challenging spaces like cathedrals or warehouses often results in a “washy,” undefined sound, despite using standard microphone techniques. The solution lies not in fighting the room, but in a strategy of “acoustic triage.” This involves understanding the venue’s unique sonic signature, making deliberate choices about which imperfections to tame and which to embrace, and using surgical microphone placements to enhance clarity without destroying the natural ambience. This guide moves beyond the basics to provide an engineering framework for turning acoustic problems into character-filled recordings.
The first note of a pipe organ echoing through a stone cathedral is a sound of profound beauty. For a listener, it’s magic. For a recording engineer, it’s the start of a tightrope walk over a sonic abyss. Capturing the authentic power of classical music on location, outside the controlled environment of a purpose-built studio, is one of audio engineering’s greatest challenges. We are tasked with preserving the delicate interplay of instruments while battling the physics of a space that was never designed for recording. The internet is filled with textbook diagrams and basic advice: use good microphones, watch out for reverb, place things carefully. But this advice crumbles in the face of a 3,000-square-foot warehouse with parallel walls or a Gothic cathedral with a 13-second reverb tail.
The truth is, a flawless capture in a flawed room is impossible. The key is not to chase an idealized, sterile perfection, but to master the art of the intentional compromise—what we can call acoustic triage. It’s a philosophy that shifts the goal from “eliminating the room” to “sculpting the room.” It requires a deep understanding of not just what techniques to use, but precisely why they work and when to deploy them. It’s about deciding which sonic battles to fight and which to concede, using spot mics as surgical tools rather than blunt instruments, and knowing how every choice, from preamp to placement, colors the final result. This guide will deconstruct this process, moving from the foundational orchestra setup to the nuances of managing noise and taming hostile environments, providing a strategic framework for your next location session.
Summary: A Guide to Recording Classical Music in Challenging Acoustics
- Why is the Decca Tree configuration still the gold standard for orchestras?
- How to use spot mics to add definition in a ‘washy’ cathedral?
- Tube Warmth vs Solid State Transparency: which suits a string quartet better?
- The placement error that makes your stereo image collapse to mono
- When to record the quietest movements: scheduling around traffic noise
- Theatre vs Cathedral: which acoustic environment is harder to mix sound for?
- Why does your converted warehouse suffer from 3-second reverb times?
- Improving Venue Acoustics: How to Eliminate Dead Zones in Converted Spaces?
Why is the Decca Tree configuration still the gold standard for orchestras?
The Decca Tree is more than a microphone arrangement; it’s a psychoacoustic marvel. Developed in an era of obsessive engineering, it has persisted because it elegantly solves the core problem of stereo recording: creating a believable and immersive soundstage. Its specific spacing—typically a central microphone flanked by two outriggers about two meters apart—is not arbitrary. It captures a blend of timing, intensity, and phase information that the human brain interprets as spatial depth and width. The center microphone provides a solid, focused mono image, while the wide-spaced omnidirectional outriggers capture the ambient, enveloping sound of the hall and the broad spread of the ensemble.
This technique was first commercially used in 1954 and its longevity is a testament to its effectiveness. Unlike simpler stereo pairs that can sometimes feel narrow or disconnected, the Decca Tree produces a recording that is both detailed and expansive. It creates a stable stereo image that doesn’t collapse when summed to mono, a critical consideration for broadcast and compatibility. For an orchestra, which is essentially a massive, complex sound source, this ability to capture both the individual sections and the collective whole in its acoustic space is unparalleled.
The reason we did this and consistently did it and got away with it and got wonderful reviews and many many awards was simply that the localisation cues were…
– John Pellowe, Former Decca engineer describing the Decca Tree setup
While often augmented with “outrigger” mics for even greater width and spot mics for clarity, the Decca Tree remains the foundational starting point. It’s the robust skeleton upon which the rest of the recording is built, providing a rich, natural, and spatially accurate capture of the performance that is difficult to achieve by other means.
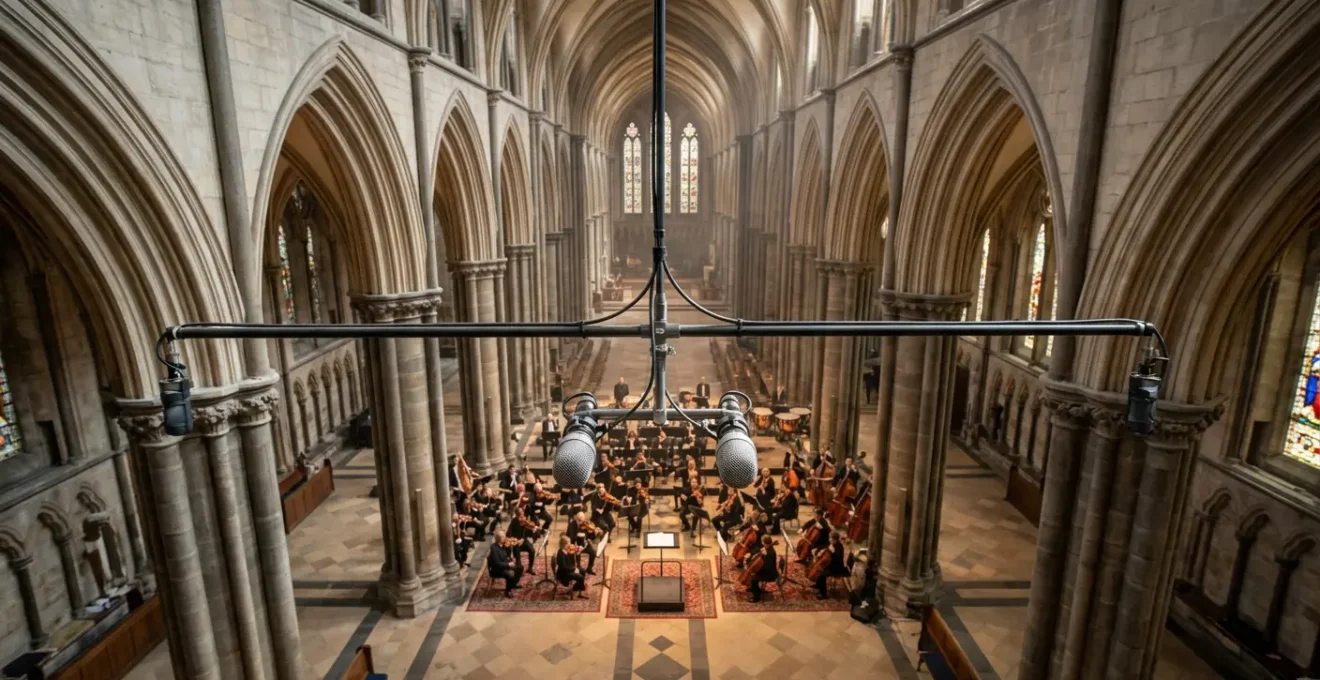
How to use spot mics to add definition in a ‘washy’ cathedral?
Recording in a cathedral presents the ultimate “acoustic triage” scenario. These spaces, with their vast volumes and hard, reflective surfaces like stone and glass, were designed to project a single voice or organ note majestically, not to resolve the intricate details of a symphony. Acoustically, they can be incredibly hostile, where cathedrals can exhibit a reverberation time that lasts up to 13 seconds. In such an environment, a main stereo pair like a Decca Tree will capture a beautiful, atmospheric wash of sound, but individual instrument lines—particularly from quieter sections like woodwinds or harp—can be completely lost in the reverberant field. This is where the surgical application of spot mics becomes essential.
The goal is not to re-mic the entire orchestra and mix it like a studio pop record. That would destroy the very acoustic signature you came to capture. Instead, the approach is one of subtle reinforcement. A spot mic, usually a cardioid microphone to reject some of the room sound, is placed relatively close to a specific instrument or section. In the mix, this spot mic is blended in at a very low level—just enough to restore the intelligibility of the instrument’s melodic line and transient attack without making it sound unnaturally close or “dry.” Think of it as gently sharpening the focus on a slightly blurry photograph.
For example, a pair of spot mics on the woodwind section or a single mic on a solo cello can be faded up only during their key passages. The key is to maintain the illusion that all the sound is coming from the main stereo pair. This involves careful use of equalization to make the spot mic’s tone match the main pair, and often adding artificial reverb to the spot mic channel to help it blend seamlessly into the natural acoustic of the cathedral. It is a delicate balance, adding just enough definition to clarify the musical intent without shattering the magnificent, “washy” illusion of the space.
Tube Warmth vs Solid State Transparency: which suits a string quartet better?
The choice between tube and solid-state preamplifiers for a string quartet goes far beyond the simple cliché of “tube warmth.” It’s a technical decision about matching the character of the electronics to the sonic signature of the instruments. The “warmth” attributed to vacuum tubes is not magic; it’s a product of their tendency to produce even-order harmonic distortion when pushed. This type of distortion is musically consonant, adding harmonics that are an octave or a fifth above the fundamental note, which the human ear often perceives as richness or fullness. A solid-state (transistor-based) preamp, by contrast, is known for its transparency and accuracy. When it distorts, it tends to produce odd-order harmonic distortion, which is dissonant and can sound harsh or clinical.
So, which is better for a string quartet? The answer lies in the nature of the source. String instruments are rich in complex harmonics and have a sharp, yet delicate, transient attack from the bow hitting the string. A high-quality solid-state preamp will capture this with breathtaking accuracy and detail, preserving the precise texture of the bow hair on the string and the complex overtones of the wood. This is often the preferred choice for a “purist” or archival recording where transparency is paramount.
However, a tube preamp can be a powerful tool for aesthetic coloration. For a quartet that sounds a bit thin or edgy, the even-order harmonics from a tube circuit can add a subtle, pleasing weight and cohesion, effectively “gluing” the four instruments together. The core difference, as confirmed by audio engineering analysis, lies in these distortion characteristics. Conversely, the slight transient softening of some tube circuits might not be ideal. As one technical comparison notes, tubes may be less suitable for instruments with powerful, quick attacks. For a string quartet, where the nuance of the bowing is critical, a slow-acting tube preamp could subtly blunt that vital initial sound. The decision ultimately rests on the engineer’s intent: pure, uncolored reality (solid-state) or a beautifully enhanced, cohesive musicality (tube).
The placement error that makes your stereo image collapse to mono
There is perhaps no error more frustrating in stereo recording than painstakingly setting up your microphones only to find your wide, detailed stereo image has collapsed into a hollow, phasey, and nearly mono sound. This phenomenon is almost always the result of destructive phase cancellation, a fundamental issue of physics that occurs when two microphones capture the same sound source at slightly different times. When these two signals are combined in the mix, the time difference causes certain frequencies to be out of phase, leading them to cancel each other out. The result is often a significant loss of low-frequency response and a smeared, unstable stereo image.
This problem is particularly common when using multiple microphones, such as a main stereo pair and a spot mic on a soloist, or even just two poorly placed spot mics on a single section. If a vocalist, for example, is captured by both the main Decca Tree and a dedicated spot mic, the sound from their voice will arrive at the spot mic first, and then milliseconds later at the main array. Those milliseconds are enough to create a “comb filtering” effect, scooping out frequencies and damaging the integrity of the sound.
While some phase issues can be corrected in post-production with specialized tools, the best solution is to prevent them at the source during recording. The most reliable guideline for this is the 3:1 Rule. This rule provides a simple mathematical relationship to minimize audible phase cancellation between two microphones. Adhering to this principle during setup is one of the most important preventative measures an engineer can take to ensure a stable and coherent stereo field.
Action Plan: Applying the 3:1 Rule to Avoid Phase Cancellation
- Measure the distance from the first microphone to the sound source (e.g., 1 foot).
- Position the second microphone at least three times that distance away from the first microphone (in this case, 3 feet away).
- Test your setup by summing the mix to mono and listening for changes in the bass response; a significant drop or “thinning” of the sound indicates a potential phase problem.
- Always prioritize readjusting microphone positions during the recording session over attempting to fix phase alignment issues in post-production.
When to record the quietest movements: scheduling around traffic noise
The signal-to-noise ratio is a foundational concept in audio, but in location recording, “noise” isn’t just the electronic hiss of a preamp. It’s the rumble of a passing truck, the wail of a distant siren, the hum of an ancient HVAC system, or the chatter of birds outside a church window. These external noises are the bane of classical recording, particularly during the softest, most delicate passages of a piece—the pianissimo sections that carry immense emotional weight. A single intrusive sound can render an otherwise perfect take completely unusable.
This is where the engineer’s role expands from technician to logistician. A crucial part of “acoustic triage” is understanding the noise environment and scheduling the recording session around it. Before the session even begins, it’s wise to spend time at the venue at different times of the day. Is there a rush hour that brings heavy traffic? Is the venue near a hospital or fire station? Is there a school next door that lets out at 3 PM? Knowing these patterns allows you to schedule the recording of the loudest, most dynamic movements (the *fortissimo* sections) during potentially noisier times, as the music itself will mask some of the background noise.
We also need to find a quiet place without too much external noise – there’s nothing more annoying than having to stop recording five times because five fire trucks have decided to pass by just at that moment!
– India Hooi, An Introduction to Classical Music Production
Conversely, you must strategically reserve the quietest parts of the day—often late at night or very early in the morning—for recording the quietest musical passages. This proactive planning is far more effective than trying to “fix it in post.” While advanced noise reduction software can work wonders, it can also introduce artifacts and alter the delicate timbre of classical instruments. As demonstrated in the case of the choral ensemble Tonality, producer Peter Rutenberg chose UCLA’s purpose-built studio specifically for its isolation from external noise, making venue selection itself a primary tool against noise pollution. When that’s not an option, scheduling becomes your most powerful weapon.
Theatre vs Cathedral: which acoustic environment is harder to mix sound for?
Comparing a theatre to a cathedral is like comparing a race car to a freight train; both are powerful, but they are designed for entirely different purposes. A modern concert hall or theatre is an environment of controlled acoustics. Architects and acousticians spend fortunes designing these spaces with specific reverberation times (RT60), using a combination of absorptive materials, diffusive surfaces, and carefully angled walls to ensure sound is clear, rich, and evenly distributed to every seat. The acoustics are an intentional part of the design, optimized for musical clarity. While still challenging, recording in a good hall means you are working *with* a system designed to help you.
A cathedral, on the other hand, is an environment of incidental acoustics. Its primary design goals were spiritual grandeur and structural integrity, not sonic intelligibility. The vast open volume, massive stone pillars, and enormous glass windows create an acoustic environment with an extremely long reverberation time. Frequencies bounce around for many seconds, smearing together and creating a dense, overlapping wash of sound. There is very little acoustic absorption, meaning sound energy decays very slowly. This creates a beautiful sense of scale and atmosphere but is a nightmare for musical detail. The clarity that a theatre is designed to provide is the very thing a cathedral’s physics actively destroy.
From a recording and mixing perspective, the cathedral is unequivocally the harder environment. In a theatre, your job is to capture the performance within a well-behaved, complementary acoustic. Your main microphone array will likely provide a balanced, detailed picture that requires minimal intervention. In a cathedral, your job is active damage control. You are constantly fighting the room’s overwhelming signature, relying heavily on spot mics to claw back definition, and making difficult mixing choices to create a sense of clarity that doesn’t naturally exist, all while trying not to lose the majestic ambience that makes the space special. It’s less about capture and more about a carefully constructed sonic illusion.
Why does your converted warehouse suffer from 3-second reverb times?
A converted industrial warehouse seems like an appealing space for a large-scale recording or rehearsal: it offers vast square footage and high ceilings. However, these spaces are often acoustic nightmares, and the reasons are rooted in their simple, functional geometry. The primary culprits for the excessive, unpleasant reverberation found in warehouses are large, parallel, and acoustically reflective surfaces. Drywall, concrete floors, and metal roofing are all highly reflective, meaning they absorb very little sound energy. When a sound is made, it bounces back and forth between these parallel surfaces, creating a dense series of echoes known as “flutter echo” and “standing waves.”
Unlike a cathedral, whose complex geometry (arches, alcoves, transepts) provides some natural diffusion to scatter sound waves, a warehouse is often a simple rectangular box. This lack of diffusion means the sound reflections are coherent and build up at specific frequencies related to the room’s dimensions. The result is a reverberation that isn’t lush and atmospheric, but rather harsh, metallic, and “ringy.” A 3-second reverb time in a warehouse sounds far more unpleasant and chaotic than a 5-second reverb time in a cathedral because the reflections are not musically pleasing.
To truly understand and treat such a problematic space, one must approach it scientifically, much like the methodologies used to preserve historical acoustics. The Cathedral Acoustics project, funded by the European Commission, pioneered methods using impulse response measurements and computer modeling to characterize the complex behavior of sound in large, reverberant spaces. Applying a similar mindset to a warehouse—identifying the problem frequencies and reflection points—is the first step toward taming it. Without significant acoustic treatment, such as adding massive amounts of absorption (bass traps, acoustic panels) and diffusion (diffusor panels) to break up the parallel surfaces, a converted warehouse will always fight against musical clarity.
Key Takeaways
- The Decca Tree’s enduring success lies in its psychoacoustically optimized design, creating a stable and immersive stereo image that simpler techniques struggle to replicate.
- In highly reverberant spaces, spot mics should be used surgically to add definition to key instruments, blended at low levels to maintain the natural acoustic illusion.
- Choosing between tube and solid-state gear is a technical decision about matching harmonic distortion and transient response to the source, not just a matter of “warmth.”
Improving Venue Acoustics: How to Eliminate Dead Zones in Converted Spaces?
Improving the acoustics of a non-purpose-built space like a warehouse or a converted loft is a battle against physics. While the previous section explained *why* these spaces are problematic, the solutions involve actively altering the room’s response to sound. One of the most common issues, beyond excessive reverb, is the presence of “dead zones” and “hot spots.” These are areas where, due to phase cancellation from reflections, certain frequencies (especially in the bass range) either disappear completely or are excessively loud. Your primary goal is to transform the room from a reflective echo chamber into a more balanced and diffusive environment.
The first line of defense is absorption. This involves introducing materials that convert sound energy into a tiny amount of heat, rather than reflecting it. This is most critical for low frequencies, which have long wavelengths and are the hardest to control. Thick, porous materials are key: large bass traps in the corners of the room, and thick acoustic panels (at least 4-6 inches deep) placed at the primary reflection points on the walls and ceiling. These points can be found using the “mirror trick”: have someone slide a mirror along the wall while you sit in the listening position; anywhere you can see the sound source (the musicians) in the mirror is a first reflection point that needs treatment.
However, a room with only absorption can sound lifeless and “dead.” The second tool is diffusion. Diffusors are specially shaped panels (often made of wood and featuring varied depths) that scatter sound energy in multiple directions. Instead of a single, harsh reflection, a diffusor creates a multitude of smaller, less-intrusive reflections that arrive at the listener’s ear at different times. This breaks up flutter echo, makes the room sound larger and more spacious, and helps create a more even sound field, mitigating the effects of dead zones. Placing large diffusors on the wall behind the musicians and the wall behind the engineer can dramatically improve the sense of space and clarity. As iZotope’s Jonathan Wyner states, everything starts at the source, and a well-treated room is a critical part of that source chain.
Ultimately, the art of location recording is about making informed, strategic decisions. It’s about approaching each new venue not as a set of problems, but as a unique instrument with its own voice. By embracing the philosophy of acoustic triage, you can move from simply documenting a performance to truly sculpting a sonic masterpiece that honors both the music and the space in which it was born. The next step is to apply this mindset to your next recording project, listening to the room first before ever placing a microphone.