Effective acoustic treatment in converted spaces is an architectural intervention, not a decorative afterthought.
- Success depends on diagnosing and mitigating the inherent structural flaws of the building, from cavernous reverb in warehouses to sound leaks that attract council notices.
- Material choice is dictated by regulatory compliance (fire safety, listed building constraints) and performance needs, not just absorption coefficients.
Recommendation: Before buying a single panel, conduct a baseline acoustic measurement to create a targeted, data-driven treatment plan that balances performance, safety, and budget.
You’ve found the perfect space: a warehouse with soaring ceilings, a character-filled church, or a historic industrial building ripe for conversion into a vibrant performance hub. The vision is clear, but once the music starts, reality hits. The sound is a chaotic wash of echo, the bass is a muddy, undefined boom, and the clarity you imagined is lost in a sea of reflections. The common advice is to “put up some acoustic panels,” but in these unique and challenging structures, that’s often a costly and ineffective solution. This approach treats a deep-seated architectural problem with a superficial fix.
The acoustic challenges of converted spaces are not skin-deep. They are born from the very fabric of the building: vast volumes of air, parallel concrete walls, and materials chosen for industry, not artistry. Treating these issues requires thinking like an acoustic consultant and an architect. It demands a strategy that goes beyond simple absorption to address structural transmission, modal resonance, and the complex interplay of sound with every surface. This isn’t about dampening a room into lifelessness; it’s about surgically taming its sonic flaws while preserving its unique character.
The true key to unlocking your venue’s potential lies not in how many panels you can install, but in understanding the underlying physics of your specific space. It involves balancing the need for clarity with the preservation of a “live” feel, all while navigating the non-negotiable constraints of UK fire safety regulations, noise abatement laws, and the preservation requirements for listed buildings. This guide moves beyond generic advice to provide a diagnostic framework for venue managers. We will dissect the most common and costly acoustic problems in converted spaces and provide targeted, technical solutions that an acoustic consultant would employ.
This article provides a detailed roadmap for diagnosing and resolving the specific acoustic issues faced by converted performance venues. Below is a summary of the critical challenges we will address, from taming excessive reverb to ensuring your installations comply with stringent UK regulations.
Summary: A Consultant’s Guide to Venue Acoustics
- Why does your converted warehouse suffer from 3-second reverb times?
- How to build DIY bass traps that actually meet fire safety regulations?
- Absorbers or Diffusers: which panel type fixes slap-back echo in small rooms?
- The soundproofing error that leads to noise abatement notices from the council
- When to schedule acoustic testing: pre-construction vs post-fit-out
- How to install immersive LED walls in Grade II listed buildings without damage?
- How to use spot mics to add definition in a ‘washy’ cathedral?
- Capturing Harmonic Resonance: Recording Classical Music in Challenging Acoustics?
Why does your converted warehouse suffer from 3-second reverb times?
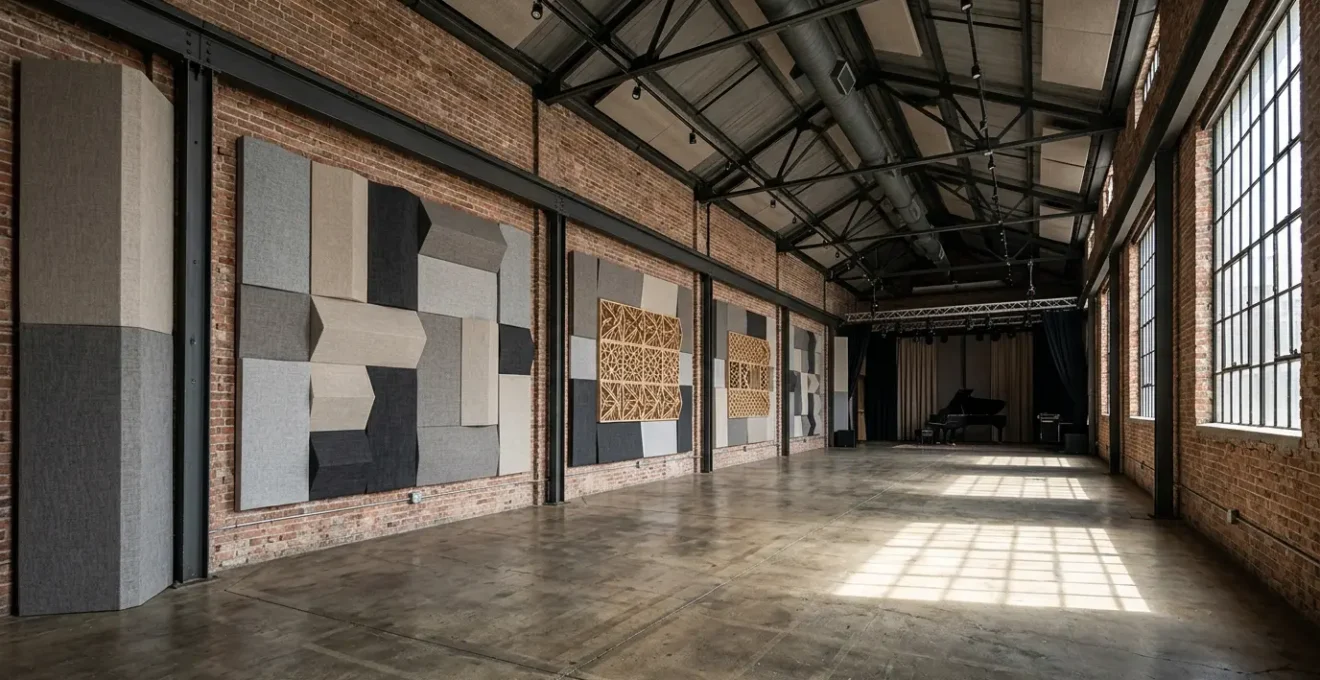
The primary reason your converted warehouse sounds like a cavern is a combination of two factors: immense internal volume and an abundance of hard, reflective surfaces. Materials like concrete, brick, metal, and glass, common in industrial architecture, reflect sound energy instead of absorbing it. In a large, boxy space, this sound can bounce between parallel walls and from floor to ceiling for several seconds before decaying, creating a dense field of reverberation. This long decay time, or RT60, can often be 3-4 seconds in an untreated warehouse, smearing musical detail and destroying speech intelligibility. For most live music performance venues, the goal is to bring this down significantly.
The ideal RT60 is context-dependent, but acoustic design standards for performance venues aim for a reverb time of around 1.2 seconds to achieve both clarity and a sense of space. Achieving this reduction requires a strategic approach. The issue is not just general echo, but also specific problematic frequencies. High ceilings can create powerful vertical modal resonances—standing waves that cause certain bass frequencies to ring out uncontrollably. Parallel walls lead to flutter echoes, a rapid, “slapping” sound that further degrades quality. A successful treatment plan must address all these issues simultaneously.
A real-world example is the Mixtape 5 venue, a converted warehouse with over 2-second reverb times in its low frequencies. The solution wasn’t just to cover the walls in foam. After detailed acoustic analysis, the primary issue was identified as modal ringing caused by the room’s height. The solution involved installing 377 square meters of tuned resonant absorbers on the ceiling. These are specifically designed to trap low-frequency energy, directly targeting the source of the “boomy” sound without over-damping the higher frequencies, thus preserving the room’s energy. This demonstrates that effective treatment is about surgical precision, not just widespread coverage.
How to build DIY bass traps that actually meet fire safety regulations?
Building effective DIY bass traps is a common cost-saving measure for venue managers, but overlooking fire safety regulations can have catastrophic consequences and invalidate your insurance. In the UK, materials used in public spaces must meet specific fire-resistance standards. The most critical benchmark for acoustic materials is the ASTM E84 test, which assigns a class rating from A to C. For a material to be considered safe for use in a venue, it must be Class A certified. This is a non-negotiable aspect of regulatory compliance.
To achieve this, building materials must demonstrate specific performance under testing. According to the standard, materials must achieve Flame Spread Index values between 0-25 and a Smoke Developed Index under 450 to meet Class A certification. Many common DIY materials, like standard polyurethane foam, do not meet this standard and are dangerously flammable. Instead, you must use core materials that are inherently fire-resistant, such as mineral wool or specific types of fibreglass, and wrap them in a certified fire-retardant fabric. The choice of material impacts not only safety but also acoustic performance and budget.
The following table provides a comparison of common, fire-safe materials suitable for DIY bass trap construction, highlighting the trade-offs a venue manager must consider.
| Material | Fire Rating | NRC Rating | Cost/sq ft |
|---|---|---|---|
| Mineral Wool (Roxul) | ASTM E84 Class A | 0.95-1.05 | $2-4 |
| Fiberglass 703 | ASTM E84 Class A | 0.85-1.00 | $3-5 |
| Fire-retardant Polyurethane | CA117/ASTM E84 | 0.75-0.90 | $4-6 |
This data shows that mineral wool offers the best combination of high acoustic absorption (NRC) and fire safety at a reasonable cost. When constructing the traps, ensure the wooden frame is also treated with a fire-retardant paint or finish, and the fabric covering is explicitly rated for commercial use. Proper construction, focusing on dense, well-sealed corner traps, is key to controlling the low-frequency modal resonance common in large, boxy rooms.
As the image illustrates, the quality of construction matters. The dense mineral wool core, properly encased in a breathable but fire-rated fabric and a solid frame, creates an effective and safe acoustic device. It is this attention to material science and regulatory detail that separates a professional, safe installation from a hazardous amateur attempt.
Absorbers or Diffusers: which panel type fixes slap-back echo in small rooms?
In smaller rooms or specific areas within a larger venue, slap-back or flutter echo is a common and distracting problem. It’s caused by sound rapidly bouncing between two parallel, reflective surfaces. While the instinct may be to cover these surfaces with absorption panels, this can lead to an acoustically “dead,” unnatural-sounding space. The choice between absorption and diffusion is a critical strategic decision that defines the room’s final sonic character. Absorption removes sound energy from the room, while diffusion scatters it.
Absorption panels are the correct tool for taming the primary reflections that muddle the direct sound from the stage. These are typically placed at the first reflection points on the side walls and ceiling. However, relying solely on absorption can strip a room of its life and energy. This is where diffusers become essential. As experts from Illuminated Integration note in their guide:
While absorbing sound dampens the overall sound in the room, diffuser panels help keep a space sounding live by scattering sound waves in random directions rather than fully absorbing them, preventing rooms from sounding too quiet while still reducing slap-back echo.
– Illuminated Integration acoustics experts, 7 Types of Acoustic Treatments guide
This highlights the central acoustic compromise: clarity versus liveness. To fix slap-back echo without creating a dead room, a balanced approach is needed. Diffusers are most effective when placed on the rear wall of the venue, opposite the stage. This placement intercepts the powerful sound energy heading towards the back and scatters it randomly, breaking up the standing waves that cause echo without removing the energy completely. This maintains a sense of spaciousness and envelopment for the audience.
A successful strategy involves mapping the room’s surfaces and assigning a role to each. A common professional target is to maintain at least 30% reflective or diffusive surfaces to preserve room ambiance. For multi-purpose venues, variable acoustic panels, which can be switched from an absorptive mode to a diffusive or reflective one, offer the ultimate flexibility, allowing the room’s response to be tailored to the specific performance, whether it’s an amplified rock band or an acoustic ensemble.
The soundproofing error that leads to noise abatement notices from the council
A noise abatement notice from the local council can be a death sentence for a venue. The most common and misunderstood reason for receiving one is not airborne noise, but structure-borne vibration. Venue managers often try to solve noise complaints by adding mass to their walls (e.g., extra layers of plasterboard). While this helps with airborne sound, it does almost nothing to stop low-frequency energy from bass and drums, which travels through the building’s physical structure—the floor, joists, and steel beams—and re-emerges in neighbouring properties. This is a classic soundproofing error rooted in a misunderstanding of acoustic physics.
The correct solution is not adding mass, but creating decoupling. This means creating a physical separation between the “loud” inner room and the building’s main structure. This is often referred to as a “room-within-a-room” design. As highlighted in technical guides, decoupling techniques using resilient channels, isolation clips, and acoustic hangers are essential to minimize this structural transmission. For example, suspending the ceiling from spring-loaded or rubber acoustic hangers prevents vibrations from travelling into the floor above. Similarly, building internal walls on a separate footing with an air gap isolates them from the main structure.
This principle extends to the stage itself. A drum kit sitting directly on a concrete floor will transmit immense vibrational energy throughout the entire building. The solution is a floating drum riser, built on dense rubber isolation pucks, which effectively decouples the kit from the floor structure. Ignoring structural transmission is the single most expensive mistake a venue owner can make, as retrofitting these solutions is far more disruptive and costly than implementing them during the initial fit-out. Proactive management and documentation are your best defence against complaints.
Action Plan: The Good Neighbour Protocol for Noise Management
- Take baseline SPL readings at property boundaries before opening using a calibrated meter and document the results.
- Install floating drum risers on rubber isolation pucks to decouple low-frequency vibrations from the floor structure.
- Prioritise creating a room-within-a-room design with air gaps rather than simply adding mass to existing walls.
- Monitor and log sound levels during all events to build a body of evidence demonstrating compliance for any potential future complaints.
When to schedule acoustic testing: pre-construction vs post-fit-out
Acoustic testing is often viewed as a final step, a way to verify the performance of a completed space. However, this post-fit-out approach is a reactive and costly mistake. Scheduling professional acoustic measurement and modelling before construction begins is one of the most effective ways to save money and achieve a better final result. Pre-construction testing allows you to build an acoustic model of the proposed design, identifying potential problems like modal resonances or flutter echoes before a single wall is built.
This proactive approach allows acoustic solutions to be integrated directly into the architectural design, which is always cheaper and more effective than retrofitting them later. For instance, instead of covering a finished wall with expensive panels, the design can be altered to use non-parallel walls, or specific wall constructions with built-in absorption can be specified from the start. Recent research demonstrates that integrating acoustic planning with architectural design can lead to a 40-60% reduction in treatment costs. This is because the building’s own form does much of the acoustic work, reducing the need for additive treatments.
While hiring a consultant is ideal, venue managers can also conduct effective baseline testing themselves with minimal investment. Using free software like Room EQ Wizard (REW) and a calibrated measurement microphone (such as a UMIK-1, which costs around £100), you can generate valuable data. The process involves taking baseline measurements of the empty space from multiple positions to get a clear picture of the existing RT60 and frequency response. You can then re-measure after each phase of treatment (e.g., after installing bass traps, then after adding wall panels) to track improvements and ensure your investment is having the desired effect. Documenting this process provides data-driven proof of your acoustic strategy.
How to install immersive LED walls in Grade II listed buildings without damage?
Integrating modern technology like immersive LED walls into a Grade II listed building presents a unique conflict: the desire for cutting-edge visuals versus the legal requirement to preserve historic fabric. Drilling into, or even permanently affixing items to, the walls, floors, or ceilings of a listed building is often forbidden. The solution lies in designing systems that are entirely freestanding and reversible, leaving no trace upon removal. Any proposed installation will require a detailed Reversible Method Statement for approval, documenting exactly how the structure can be removed without harm.
The primary method for achieving this is to use a ground-supported truss system. Instead of attaching to the building, the LED wall is built onto an independent metal truss structure that stands on the floor. The stability of this structure is provided not by bolts, but by carefully calculated ballast weights placed at its base. These weights must be distributed over large plates to avoid creating point loads that could damage fragile historic flooring. This approach ensures zero contact with the protected walls of the building.
From an acoustic perspective, a large, flat LED wall is a highly reflective surface that can reintroduce the echo problems you’ve worked hard to solve. Every surface in a room contributes to its acoustic signature, and adding a giant glass or plastic screen is a significant alteration. To mitigate this, two strategies are key. First, specify micro-perforated LED screens. These panels have tiny holes that allow a significant portion of sound to pass through them to be absorbed by treatment placed behind the screen, dramatically reducing reflections. Second, angle the entire wall slightly, perhaps 5-10 degrees downwards or sideways, to deflect any remaining reflections away from the audience and towards an absorptive surface rather than back into the listening area.
How to use spot mics to add definition in a ‘washy’ cathedral?
Recording or amplifying music in a cathedral or large church is the ultimate acoustic challenge. The very reverberation that makes a choir sound majestic and ethereal can turn an orchestra or a solo instrument into an undefined, “washy” mess. The key to capturing clarity in such an environment is not to fight the reverb, but to manage it through strategic microphone technique. While a main stereo pair of omnidirectional microphones is essential to capture the glorious hall ambience, spot mics are used to add focus and definition to individual instruments or sections.
The crucial factor in a spot mic’s effectiveness is its polar pattern, which determines its directionality and ability to reject off-axis sound—in this case, the overwhelming room reverb. An omnidirectional mic captures sound from all directions, while a cardioid pattern is more focused on the front. For maximum rejection of reverberation, even more directional patterns are required. The choice of pattern depends on the source and its distance from the microphone.
The following table outlines the best microphone patterns for spot miking in highly reverberant spaces, highlighting their reverb rejection capabilities and ideal applications.
| Mic Pattern | Reverb Rejection | Best Application | Typical Distance |
|---|---|---|---|
| Hypercardioid | High (12-15dB) | Solo instruments | 0.5-1m |
| Shotgun | Very High (15-20dB) | Distant sources | 1-3m |
| Cardioid | Moderate (6-10dB) | Close miking | 0.2-0.5m |
| Omni (main pair) | None | Ambience capture | 3-5m |
As the table shows, a hypercardioid microphone is the workhorse for spot miking soloists or small sections. Its tight pickup pattern provides significant rejection of room sound from the sides and rear. A shotgun microphone offers even greater directionality, making it suitable for discreetly capturing sources from a greater distance, such as a lectern or a distant choir section. The art is in the mix: the spot mics should be blended in subtly, typically 10-15dB below the main ambient pair. Their purpose is to add a touch of clarity and presence without overpowering the natural, beautiful resonance of the space.
Key Takeaways
- Acoustic treatment is an architectural discipline focused on mitigating a building’s inherent structural flaws, not a decorative one.
- Regulatory compliance is paramount. All material choices and structural modifications must adhere strictly to UK fire safety and noise abatement laws.
- The “ideal” acoustic is use-case dependent. A space optimized for amplified music will differ significantly from one designed for classical performance or speech.
Capturing Harmonic Resonance: Recording Classical Music in Challenging Acoustics?
The acoustic goals for recording classical music are often diametrically opposed to those for a live, amplified music venue. While a rock venue might aim for a tight, controlled reverb time of 1.2 seconds, classical music thrives on a much richer, more resonant acoustic. Studies have shown that favorable reverberation times for violin solos range from 1.8 to 2.4 seconds. This long, lush decay is part of the instrument’s sound, and the recording engineer’s job is to capture it faithfully, not eliminate it. The challenge arises when this resonance becomes uncontrolled or when trying to record in a space with poor acoustics.
When faced with a beautiful but overly reverberant hall, the primary technique is not to add absorption, but to use a meticulous microphone setup that balances direct sound with room ambience. The gold standard for this is the Decca Tree configuration, which uses a main stereo pair (often supplemented by a center mic and outriggers) to capture the overall ensemble and the hall’s natural resonance. This forms the core of the sound. Spot mics, as previously discussed, are then used sparingly on key sections or soloists to add just enough definition to prevent them from being lost in the wash.
The final blend is what matters. The spot mics are mixed in at a very low level, just enough to enhance intelligibility without making the instrument sound unnaturally close or “dry.” In post-production, a last resort is to use selective de-reverberation software. This allows an engineer to reduce the reverb on a specific instrument or passage for a few moments where clarity is critical, without affecting the overall ambient soundscape of the recording. This surgical approach preserves the harmonic resonance of the space while solving specific problematic moments, representing the ultimate acoustic compromise.
To effectively transform your venue’s sound, the next logical step is not to purchase materials, but to conduct a thorough acoustic audit based on these principles. Begin by measuring your space, identifying the core issues, and formulating a plan that respects your building’s architecture, your legal obligations, and your artistic vision.